This week I'm going to take a look at making your PC workstation more secure by configuring AppArmor to work with some common applications. First though a little foreword about computer security.
Unfortunately computer security is rarely out of the news these days. If it's not the anti-virus companies trying to foster a climate of fear with portents of doom about the next trend in virus writing & Trojans, or media giants infecting hundreds of thousands of Windows PC's with root kits; it's phishing attacks and identity theft, distributed denial of service (DDoS) attacks and of course the perennial spam problem.
Wow. Stop to consider all that and you might think that they are out to get you, and you would be right! Believe it or not the average home PC is a valuable target for all sorts of criminal activity. Identity theft is an escalating problem and even if you have no information of value on your PC the very fact that it's connected to the internet by increasingly faster broadband connections makes it a valuable resource to launch DDoS attacks from. DDoS attacks being the favourite mechanism with which to enforce the lucrative blackmail campaigns against on-line businesses in recent years.
Even if your silly enough to disregard the threat of identity fraud, you still have a social responsibility to secure your PC. Much like you secure your home or car with locks to deter criminal activity you should also take personal responsibility for securing your PC or other devices connected to the internet. The very first responsible thing you can do is choose not to use software which is insecure by design but you know that already. That's why you dropped the hacker honey pot combination of Windows/Internet Explorer/Outlook Express and that's why you're reading about making your Linux PC even more secure.
What is AppArmor?In a nutshell, AppArmor is a security framework for applications. AppArmor prevents applications from performing undesirable actions and enforces good application behaviour. It can protect against flaws in applications that lead to exploits, even 0-day exploits. A more detailed description can be found on the openSUSE.org AppArmor page http://en.opensuse.org/AppArmor_Detail
Will it stop me from getting hacked or r00ted?This is a difficult question to answer, it's perhaps impossible to guarantee that one single security tool can prevent malicious attack of any kind. Computer security is often described as a chain, with the whole security of the system only as strong as the links in the chain, one weak link and the chain breaks. Managing security is about managing and mitigating risk. Using AppArmor mitigates against certain types of attack and in some cases completely prevents certain attacks. With this chain analogy in mind then AppArmor significantly increases increases your workstation security; however I would urge anyone considering using AppArmor or extending their use of AppArmor within SUSE Linux to not solely rely on it but to use it in conjunction with other security tools and threat mitigation.
AppArmor & SUSE LinuxAppArmor is included in both SUSE Linux 10.0 &10.1 however as usual SUSE Diary will focus on 10.1. AppArmor is enabled by default in 10.1 and is already protecting certain applications, utilities & libraries.
## Update ## Thanks to Seth Arnold for this suggestion.The man documentation pages for AppArmor are very clear and helpful, you can list the available man pages for all the AppArmor utilities with:
man -k aa-
Also, konqueror in KDE has a nice plug-in for viewing man pages, for example enter man:aa- in the konqueror address bar and it will list the available AppArmor man pages for viewing in a nice formatted output. Tab completion also works for this plug-in.
If for any reason you did not install AppArmor with your installation or upgrade then you can install the following packages from the SUSE Linux 10.1 installation media or one of the on-line installation repositories.
libapparmor
apparmor-profiles
apparmor-utils
apparmor-parser
yast2-apparmor
apparmor-docs
If you are unsure of how to add additional installation repositories please see the SUSE Diary article showing how to install software using the
new package management tools in SUSE 10.1As you can see, AppArmor for SUSE Linux includes some pre-configured profiles, utilities a YaST2 module and documentation. AppArmor source is also available if you want to try building it for another distro
http://forge.novell.com/modules/xfmod/project/?apparmorHow AppArmor works
AppArmor works at the kernel level by restricting applications to certain access and operations as defined by an application policy. In SUSE Linux this is provided by a kernel module 'apparmor'. The policies themselves are text files outlining permissions and capabilities using very familiar UNIX like semantics.
The permissions are the familiar read, write and execute, as well as link. The capabilities are POSIX.1e compatible as defined in the capabilities man page. An AppArmor confined process can restrict privileged operations such as reboot, create_module, mount etc.
Securing an application - Firefox
As as said before, some applications are protected by default in SUSE Linux 10.1, these include postfix and syslogd and certain utilities such as ldd, ping, netstat. There are extra profiles included with the AppArmor package but please have a look at the REAME before using them.
/etc/apparmor/profiles/extras
/etc/apparmor/profiles/extras/README
For demonstration purposes though I'm going to assume that there is no preconfigured profile for the application you want to secure, in this case Firefox.
Securing an application with AppArmor involves the following steps and is a fairly simple process, the AppArmor utilities automate most of the profiling for you.
- Create a profile for the application you wish to secure
- Load the profile in learning(complain) mode
- Modify the profile based upon learning mode results
- Load the finished profile in enforcement mode
Creating a profile
To create a profile for an application you can either use the genprof command line utility or you can use the GUI module in yast. The functionality of the two methods is almost identical so its really a matter of personal preference. Lets create a profile for Firefox now.
using genprof on the command line:
excession:/home/cenuij # genprof firefox
Writing updated profile for /usr/lib/firefox/firefox.sh.
Setting /usr/lib/firefox/firefox.sh to complain mode.

Please start the application to be profiled in
another window and exercise its functionality now.

Once completed, select the "Scan" button below in
order to scan the system logs for AppArmor events.

For each AppArmor event, you will be given the
opportunity to choose whether the access should be
allowed or denied.

Profiling: /usr/lib/firefox/firefox.sh

[(S)can system log for SubDomain events] / (F)inish
Here 'genprof' does a few things. First it resolves the application path and then checks to see if there is already an existing profile. If no profile exists it uses the AppArmor utility 'autodep' to create a basic profile containing the path to the application and uses 'ldd' to include any library dependencies. It saves the basic profile in /etc/apparmor.d using the naming convention of replacing any slashes in the application path with full-stops ( periods ). So the Firefox profile is saved as /etc/apparmor.d/usr.lib.firefox.firefox.sh Lastly, 'genprof' loads this profile in learning(complain) mode and asks you to start using the application so that the necessary access and resources the application needs can be learnt.
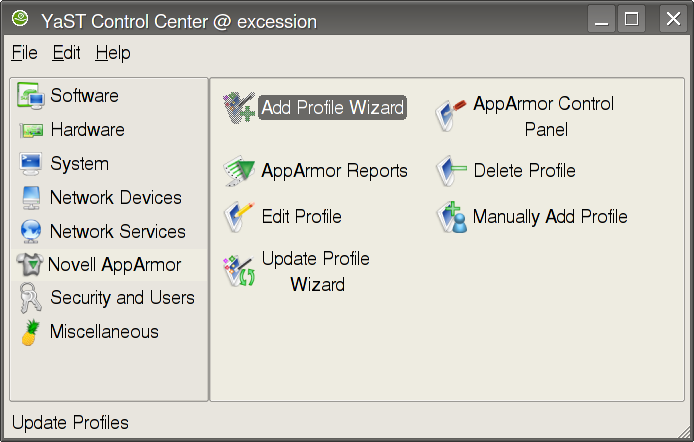
Lets look at the same thing using the 'Add Profile Wizard' in the AppArmor YaST Module
Diagram 1: AppArmor YaST module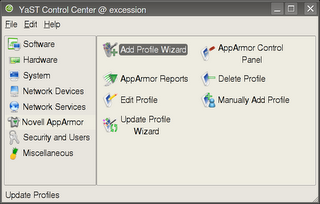 Diagram 2: Enter application name or browse for it
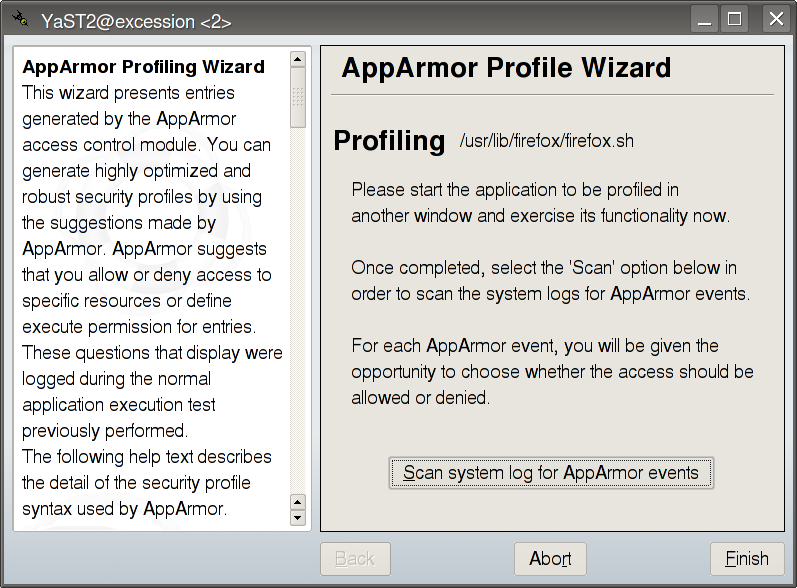
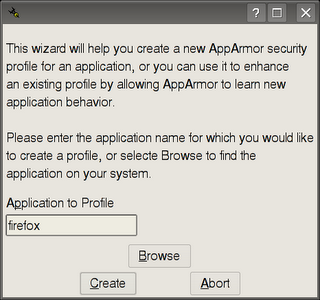 Diagram 3: During application profiling
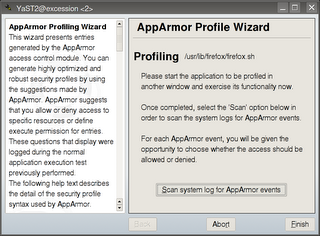
When your using your application while the basic profile is loaded in learning mode, access to files and directories, calls to other applications and privileged operations are logged in the system log with a marker that allows AppArmor to learn what the application does.
When your sure that you have used the capabilities of the application now you can continue and modify the profile to allow or disallow the things that AppArmor has learnt about your application.
Close the application and either go back to the console window or press the button in YaST. Lets look at what's next in genprof command line first. Press 'S' to continue.
[(S)can system log for SubDomain events] / (F)inish
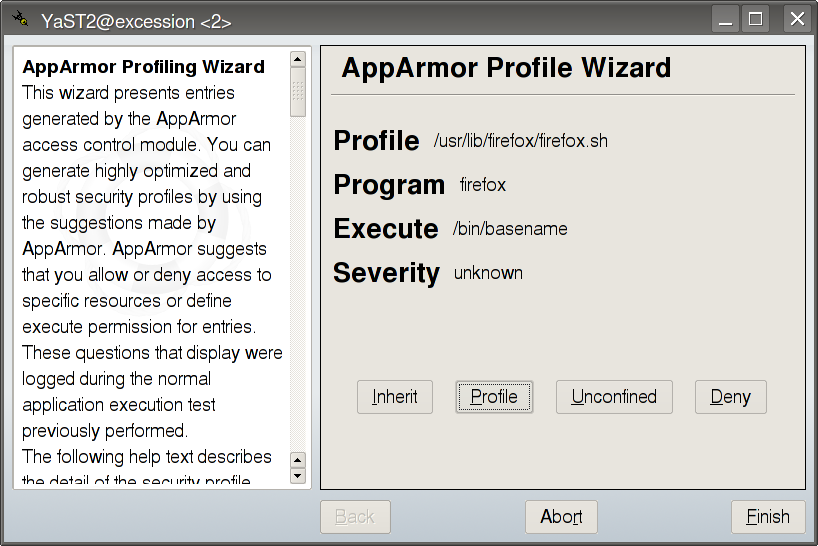
Now genprof will ask you a series of questions based upon what it has learnt about your application. The first set of questions relate to other binaries or applications that your program may have accessed.
Profile:  /usr/lib/firefox/firefox.sh
Program:  firefox
Execute:  /bin/basename
Severity: unknown

[(I)nherit] / (P)rofile / (U)nconfined / (D)eny / Abo(r)t / (F)inish
Here Firefox has accessed /bin/basename and you have a choice of three execute modes or deny access.
Inherit: With this mode the program accessed runs with the same AppArmor profile as Firefox, you would normally choose this for helper programs. An example of a helper program would be Firefox requesting to use Adobe Acrobat Reader.
Profile: Profile access requires that the program being accessed runs has its own AppArmor controlled state with its own profile. An example of this would be if your application needed access to a system service such as DNS.
Unconfined: Allows the program being called to run in an unconfined state. This choice should be avoided unless absolutely necessary.
Lets look at the same choices in YaST ( Diag. 4 )
Diagram 4: Profile wizard - access settings for external applications or services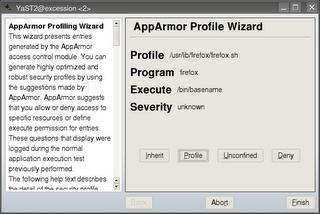
After you have specified permissions for programs your application may access you are then asked similar questions about which files, directories and file paths that your application should have access to.
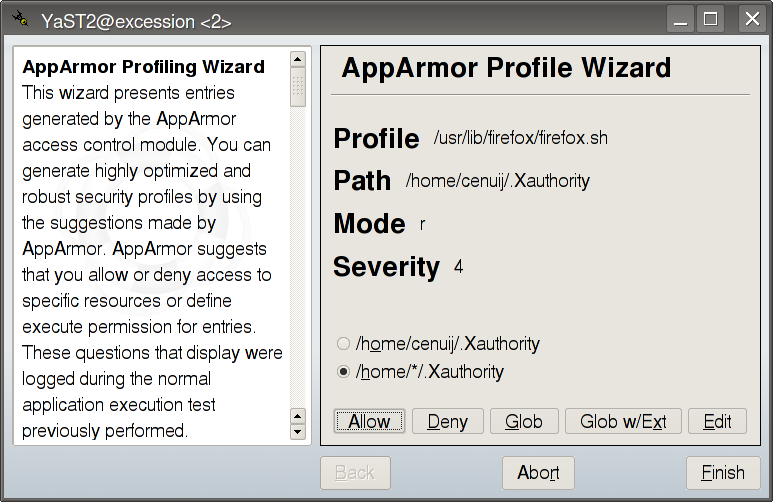
In genprof on the command line:
Profile:  /usr/lib/firefox/firefox-bin
Path:     /home/cenuij/.Xauthority
Mode:     r
Severity: 4

1 - /home/cenuij/.Xauthority
[2 - /home/*/.Xauthority]

[(A)llow] / (D)eny / (G)lob / Glob w/(E)xt / (N)ew / Abo(r)t / (F)inish
Here you are provided with what type of access the application requires and you must allow or deny it.
Allow: Allows access
Deny: Denies access
Glob: Modify the original path using wildcards e.g. /home/cenuij/*
Glob w/ext: Modify the original path using wildcards but keep any filename extension e.g. /home/cenuij/*.ext
The same thing in YaST: ( Diagram 5 )
Diagram 5: Profile wizard – access settings for application files and paths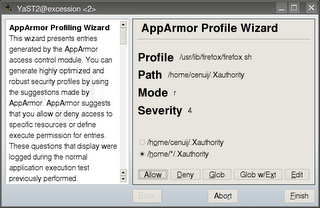
During the course of answering these questions you may be able to select an #include to allow access to. For example you may have the choice of /dev/tty or #include
. #include statements allow access to applications and services which already have AppArmor confined profiles.
When all the questions have been answered simply press (F) if your using genprof or press the finish button in the YaST module. Your application profile will now be loaded in secure 'enforcement' mode securing any further use of the program according to your settings.
Generally speaking, the more complex a program then the more complex the policy will be. Also, you should be aware that large or complex programs may require a bit of fine tuning after the initial profile generation. Commonly this is because you want to use some functionality in the program that was not initially used when the applications profile was in learning(complain) mode. Here's a basic troubleshooting scenario using Firefox as an example.
Basic AppArmor troubleshootingScenario: You have changed the default location where files will be saved to in Firefox. Files that you download are not saved in that location and cannot be found. Firefox is protected by AppArmor with its own profile.
In this scenario the most likely explanation for being unable to download the files to the new location is that either you did not use the download functionality of Firefox when you were setting up the initial profile; or the profile only allows Firefox access to save files to the original download location.
Solution: To allow Firefox to save downloads to the new location you must update your AppArmor profile with the path of the new default download location.
There are two ways you can modify your Firefox AppArmor profile.
- Manually edit the profile to include the new path location.
- Load the profile into learning(complain) mode and then use Firefox to download a file to the new location. Use the AppArmor utilities to scan for changes in the application behaviour ( saving files to a new location ) and update the profile using suggested settings.
Method one may be time consuming depending on the complexity of the changes and may also be more prone to bugs and errors. Also consider the security implications of making incorrect manual adjustments to the application profile. However some people just like getting their hands dirty in configuration files and in which case the Novell AppArmor documentation is where you should head to,
here's the section on profile syntax and structure.
Method two is pretty easy to do, at the console: either run 'genprof firefox', use your application making sure to utilise the functionality you need, scan the changes when your finished. Alternatively load the profile into learning mode with 'complain firefox', use the program and then run 'logprof' to scan and make the changes.
If you wish to use YaST simply make the changes manually using the 'Edit Profile' option or run the 'Add Profile Wizard' again – see Diagram 1. Running the wizard on an existing profile loads it into learning (complain) mode so you can use the application and learn new functionality.
Additional HelpAdditional help for SUSE Linux 10.1 can be found on the
mailing lists or alternatively you can drop by the IRC chat channel #suse on freenode IRC network. If you are using KDE in SUSE Linux 10.1 then the IRC chat client Konversation is already configured to connect to the #suse channel on freenode IRC network.
digg this!